Army. Today they help you have fun and try your accuracy. In this material we will review a video on making a powerful compound bow.
What do we need:
- wooden blocks;
- metal corners;
- self-tapping screws;
- screwdriver;
- rollers;
- steel plates;
- loops;
- aerosol paint;
- two powerful springs;
- strong rope;
- sandpaper.
We take one wooden beam 38 cm long, 2 cm thick and 4 cm wide, and two shorter beams - 16 cm long. We fix two small beams on the long one using metal corners and self-tapping screws.


We strengthen the handle with additional long-lasting screws.


As a result, we should get a similar design.

We process the resulting handle with sandpaper.

According to the author, rollers for making bows can be purchased at the car market. The author, for example, uses rollers that are used to raise car windows. Two of these videos can be purchased for a dollar.

Next, we take the steel plates and bend them as shown in the figure below.

Using these plates, we secure the rollers to the bars with self-tapping screws.


Next, we need to secure the shoulders to the handle and we will do this using door hinges, which we also fix with self-tapping screws.

Before fastening our structure, you can paint it with regular spray paint.

Next, take two corners and attach them to the free edges of the shoulders.

At this stage, we will need a pair of powerful springs, which can also be purchased at the car market, again for a dollar. We attach one edge of the spring to the corner, and the other to the handle. To do this, you need to make a notch on the handle. You also need to make a through hole on the handle and thread some kind of convenient bolt into it, on which the second end of the spring will be fixed.


The compound bow is almost ready. We take a strong rope and fix it on the shoulder of the bow, threading it through the hole.


Next, we pass it through the opposite roller from the inside and through another roller from the outside. In the same way we attach the edge of the rope to the other shoulder.


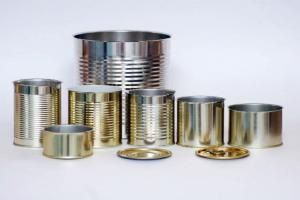
An arrow rest can be made from a spray with a moving plastic part. We need exactly the moving part on which the arrow will rest. When fired, the part will fall down and will not prevent the arrow from flying out of the bow.
Once upon a time, the bow was the main weapon of most peoples of the earth. The bow is the most ancient fighting and hunting weapon on earth, and although modern weapons are superior in power, a simple bow can be extremely useful for survival in nature if you have to hunt for food. In addition, you can always brag about it to your friends. Read on and you will learn how to make a bow and arrow yourself.
Steps
Onion
- Find a strong, dry stick with no cracks. Hardwoods such as lemonwood, oak, yew, locust or teak would be good choices for the rod. The rod should be about 1.8 m long and should be free of knots, twists and branches.
- The rod you choose should be flexible, like juniper or mulberry. You can also use bamboo wood or reed; The main thing is that the rod you choose is not too thick. You can use young bamboo, which is both strong and flexible.
- Green twigs can be used, but should be avoided as they are not as strong as dry twigs.
-
Find the natural curve of the stick. Each stick has its own curve, even if it is difficult to notice. You'll want to consider the natural curve of the stick when you start making your bow. To find a natural bend, place the stick on the ground and press it with your hand at the top. With your other hand, press the stick into the ground in the middle. Now its natural curve should be facing you.
Define the edges of the bow and its handle. This is very important in the bow making process. To find where you will hold the bow, make marks on the bow above and below 7.5cm from the center point of the bow. What is in the middle of these marks is where you will hold the bow.
Shape your bow. Place the bow on your leg and hold it on top with your hand. With your other hand, press down on the bend to determine where your bow is more flexible. Using a knife or similar tool, scrape away any knots or other rough edges from the middle of the bow. The top and bottom of the bow should be almost identical, so plan away any excess wood if necessary. Once the bow is smooth and the top and bottom are mirror images of each other, you can move on to the next steps.
- The thicker, stronger bow should be exactly where you will be holding it.
- Be careful when handling onions, as too much pressure and even slight damage to the structure can lead to breakage.
-
Make notches to attach the bowstring. Using a knife, make a notch at each end of the rod. Their distance should be from 2.5 to 5 centimeters from the tip. The notches should resemble a crescent moon and should be on the outside of the bow. The notches should not be too deep so as not to damage the bow, but, on the other hand, deep enough to hold the bowstring.
Select a string. If you're outdoors, you'll have to search hard and try a variety of materials to find the right bowstring. Suitable bowstring materials:
- rawhide;
- thin nylon cord;
- hemp rope;
- fishing line;
- strands of cotton or silk from caterpillars;
- ordinary twine.
-
Arrows
-
Find branches for arrows. Arrows should be made from straight, dry branches. The length of the arrow should not exceed half the length of the bow. It is even better that the length of the arrow does not exceed the length of the bend of the bow, since there is no point in arrows that cannot be drawn. Here are several types of wood that can be used as arrows:
- Green twigs aren't a bad choice for arrows, but you'll want to give them some time to dry as the sap can ignite if you dry them over a fire.
- Goldenrod is great for making arrows because it has strong, straight branches. It can be easily found in the fields.
-
Shape the arrows. You will need to scrape the branch until it is smooth. To straighten a branch, you can lightly heat it over the coals and keep it straight while the tree cools. Make notches at one end of the arrow so it can catch on the string.
Sharpen the tip of the arrow. The simplest tip is the pointed end of an arrow. You can sharpen the arrow with a knife and then lightly burn it over warm coals to stiffen the arrow (again, be careful not to burn the arrow).
If possible, do arrowheads(this is an optional step). Tips can be made from metal, stone or glass. Use a hammer or stone to slightly split the tip of the arrow and insert the tip there. The tip can also be secured with rope.
-
Make fletchings for the arrows (optional). Although fletching contributes to the stability of arrow flight, you can do without it. Find the feathers and glue them to the back of the arrow. You can also split the back of the arrow and insert the fletching into the groove, then wrap it tightly with thread (you can use thread from your clothing). If you use this method, you can use anything as fletching.
- The fin acts like a rudder on a ship or small plane, as it guides the arrow through the air with greater precision.
- Fletching also improves the arrow's range of use.
- However, plumage is not that easy to make. If your weapon is intended to be a survival weapon, the fletching is not as important.
- First try making a bow from a branch. This bow will not be dangerous and is suitable for beginners.
- Learn to shoot a bow.
- Always keep the bow away from your face.
- Use smooth wood whenever possible. Rough wood can scratch your hands and damage your feathers, making it difficult for you to hit your target.
- If you are checking the tension of the bowstring, do not release it without an arrow, otherwise there is a high chance of ruining the bow over time.
- If you are going to fish with a bow, try to aim slightly lower than the fish due to the refraction of rays in the water. When fishing, plumage may be unnecessary.
- If you're bowfishing, tie a string to one end of the arrow so that if you hit a fish, you can pull it out.
- It is not necessary to fletch the arrows when making them. You can simply cut a few shavings from your arrow and leave them hanging on one side.
- To start a fire with a bow, you will need to collect dry moss, dry fiber or any other tinder, find a piece of hard wood the size of your palm, and a piece of soft wood (softer than your arrow). Make a cut in a piece of soft wood about 3 centimeters deep and place the tinder over the cut. Make a small hole no larger than 10 centimeters in the solid wood to accommodate the arrow. Wind a pointless arrow into the bowstring and place the back of the arrow in a hole in hard wood. Be careful that the arrow does not jump out of the hole and injure you. Place the end of the arrow into a notch in a soft tree. Begin to draw the bow back and forth in an even motion. The soft wood will begin to heat up and smoke, and at some point, embers should begin to appear. These coals will fall into tinder. If you gently blow on the tinder, you will create a fire!
- Wrap the bow handle tightly with wet leather and let it dry. This way you will have a stronger bow and your arrows will fly out faster.
- To test your bow's strength, bend it. If you feel it breaking, it is not strong enough.
- You can cut the handle 1 cm deep and 2 cm high so that you can keep the arrows level when pulling the bowstring.
- To increase the power of a bow, you can make two identical bows and tie the front of one to the front of the other, so that when viewed from the side you get the letter "X". They should be tied at the ends, and the string should only be on one bow.
- It is better if the string is about one and a half meters, so as not to make a mistake with the length you need. The excess string can be cut off.
- Instead of a notch (to keep the arrows level), you can wrap the handle in deerskin. For a better grip on the bow, glue or tie it.
- Make holes in the arrows to make them lighter.
- The onions described in this article will not last forever and are only a temporary solution. Luckily, replacing it is easy.
Warnings
- Always wait until everyone has finished shooting before collecting arrows.
- You should take a bowstring with you when you go camping as it is difficult to make from natural materials.
- The more you use a bow, the more likely it is to break. Replace onions every 3-5 months.
- Bow and arrows are dangerous weapons! Be careful when training with him and never aim at someone you don't want to hurt.
- The bow is not a simple weapon, and it takes a lot of practice to learn how to use it. If you find yourself in a situation where you have to hunt to survive, it's best to make traps.
- Be extremely careful with knives and axes.
- Keep bow and arrows away from children.
- When shaping the bow, chip only on the inside of the bow. If you chip from the outside, it is likely that the bow will break the first time you use it.
- If the arrows are too short, pulling them can injure your hands.
- Before shooting, protect the hand that will hold the bow. When you release the bowstring, it hits your hand hard.
What you will need
- Hard rod: about 1.80 centimeters in length and 12 centimeters in diameter. A good tree is yew or oak.
- Inelastic bowstring: nylon rope, sinew, fishing line and so on.
- Woodworking tools: axe, special knife, sandpaper, plane (large and small), file.
- More or less straight arrow branches. They should be about 80 centimeters. Straighten them using fire. You can make arrows from wood or planks. Cut 1cm square pieces and use special cutters to make almost perfectly round arrows.
- Feathers for plumage. Use feathers from the bird's tail or wings. If you are using wing feathers, try not to mix left and right wing feathers. The fletching gives a good spin to the arrow.
- Flint tips: metal 1–2 mm thick. Use a lathe to cut and sharpen the tips. You can use plastic tips.
- Steel wool for processing green rods.
-
Select a large bow rod. There are a few things to consider when choosing a rod:
Since childhood, many of us have dreamed of mastering archery techniques so that, like Chigachgook, Robin Hood and other famous characters, we can accurately hit a target from a long distance. For some, these dreams are still alive to this day.
Nowadays, onions can be bought quite easily in the store. But it’s much more interesting to make it yourself. This way you can take into account all the individual features so that the projectile is as convenient as possible for you.

In addition, such a creation will certainly become a source of pride for you and will increase the rating of your personal achievements. This article contains the clearest and most useful instructions and photos on how to make a bow yourself.


Varieties of bows
First, let's look at what classifications of these weapons exist.

In terms of design, bows are:
- Solid;
- Block;
- Collapsible.

In terms of application, bows are divided into:
- Hunting;
- Fishing;
- Sports.

Based on the material, the following types of bows are distinguished:
- Wood;
- Metal;
- Fiberglass;
- Combined.

In the vastness of Russia, the simplest and most economical material is wood. Next you will find a master class on how to make a solid shooting bow from ordinary wood at home.

Design Features
Regardless of the material, type and purpose, the following parts are distinguished in any bow:
- The handle is the central part from which the arrow begins to fly;
- Limbs are the curved ends of the bow onto which the string is attached.
The optimal length of a bow and arrow depends on the height of the shooter. To calculate the ideal proportions of your future bow, measure the span of your arms and use the table that can be found on the Internet.

Preliminary preparation
The process of making a bow takes quite a long time. What can you make onions from at home? Which tree is better to choose? What tools will you need? By following all the recommendations, you can build a bow that will last you more than one season.


The base branch for the future onion is cut down in winter at a good sub-zero temperature. This is necessary to keep the tree sap inside the trunk.

The length of the future base is on average about 2 meters (the length of the bow that suits your height plus 30 centimeters), the diameter is about 4-5 cm. Choose straight branches with a minimum number of knots and growths. Deciduous trees are suitable for our purpose, and in particular: acacia, apple, ash, oak, hazel or juniper.


The cut areas must be coated with paint or a special oil impregnation.

We hang the branches in a vertical position and leave them to dry until the weather warms up (recommended drying time is 3-5 months at room temperature)

Manufacturing process
There are a few simple tricks that will tell you how to make a quality bow and arrow. When our base is completely dried and ready for further processing, we determine the natural bend of the tree.


To do this, we press the branch to the floor, and it automatically turns with its curved side down. When subsequently shaping this base, take into account the natural curves of the wood to avoid breaks and cracks.

Step-by-step instructions for making a bow:
As soon as our branches have dried, we begin to form the bends.

Bend Formation
Steaming. Using wooden blocks, fix the arms of the future bow in the desired position and spray them with a generous portion of water steam.

ATTENTION! Both arms must be sent at the same time, otherwise you will not avoid bending the structure. Without removing the bars, leave the base in this position for another week until the wood is completely dry.

Thread tension. Prepare a special board with cuts and place it in the center of the future bow, perpendicular to the base. Connect the ends of the bow with a strong thread and thread this thread into one of the cuts on the board.


Slowly unroll the board, gradually bending the base of the bow. Be extremely careful not to crack the wood. In this position, leave the structure to “get used to” for 5-7 days.


Using a sharp knife or hatchet, we clear the dried base of bark and trim off the excess wood with a plane. The bow should be about 3 cm thick. In the central part, mark the handle and make a recess for the arrow.

Adjust the length of your bow. At the ends of the arms, stepping back about 3 centimeters from the edges, we make indentations for the bowstring about 3-5 mm deep.

Sand the resulting onion mold using sandpaper and coat it with wax or varnish. Leave to dry.

Making a bow string
The first requirement for a bowstring is strength. Therefore, it is very important to choose high-quality, strong material.

Base options:
- Nylon or Kevlar;
- Nylon;
- Fishing line;
- Leg-split.

The length of the string should be made less than the distance between the arms of the bow so that it remains in a taut position at all times. To measure its exact size, bend the bow until the discrepancy between the indentations in the shoulders and the center of the bow reaches 15-17 cm. This is the optimal distance between the handle and the bowstring.

In this position, measure the distance between the gaps on the arms and get the length of your future bowstring. For further work you will need a board measuring 200 by 10 cm and 2 large thick nails.

Step-by-step production of a bowstring:
Hammer the nails into the board, leaving a distance of about 150 cm between them. Unwind more of the base you have chosen and secure it to one of the nails without tying a knot (you can wrap it many times).

Make several turns of thread from one nail to another, maintaining tension. The number of turns depends on the chosen material (2-3 turns are enough for nylon thread, five for linen thread, and at least fifty for lavsan thread). Tie the ends of the threads together.


We make a protective winding on the ears of the bowstring (those places where it will be attached to the bow). About 10 cm from the nail, we divide the turns into two strands and insert a spacer between them.

We tie a knot on one of the strands and begin a tight, careful winding with nylon thread. We try to make the turns as tightly and close to each other as possible. The duration of such a wrapped area is 15 cm.


Using a similar method, we wrap the middle of the bowstring - the place where you will hold on with your fingers. It is also recommended to make a saddle - a seal on the bowstring on both sides of the place where the arrow will rest. This will save you from having to adjust a moving arrow while aiming.

Putting on and checking the bowstring
Now we need to check the tension of our bowstring. Secure the bow to any vertical surface, place one eye over your shoulder, bend the bow slightly and pull the other eye.

After this, we begin to slowly pull back the string, observing the behavior of the bow. Make sure that the arms bend evenly, both relative to each other and relative to the entire body of the bow.

Making arrows
Arrows are made from spruce, birch or pine wooden blanks.


We take well-dried solid boards (we determine the length of the future arrow using the table at the beginning of the article). Using tools, we cut them into bars and give them a round shape at the end. The diameter of the arrow should be about 6-8 mm.

We attach a triangular steel tip to the arrow. In the back of the arrow we make a cutout corresponding to the diameter of the bowstring. We sand its inside and reinforce the starting point of the cut with thread to avoid delamination of the arrow.

The constant attribute of any arrow is the feather at the end. It plays the role of a stabilizer during flight. Crow or goose feathers are suitable for this purpose.

Now you have all the instructions on how to make a good bow. But it is very important not only to make it correctly, but also to maintain your creation in the right conditions so that it retains its original shape and excellent characteristics for a long time.

Here are some valuable tips for storing onions at home:
- Keep the bow upright
- Remove the string after each use. Don't keep it tight.
- Each time before use, make several smooth bends of the structure. This procedure will help “warm up” and help avoid breaks.
- Do not keep onions in the sun for a long time. It should be stored in a dry, dark place.

That's all! You can get down to business.

Photo of a homemade bow


Archery can be classified as one of those activities that almost every person can master. This is a very unusual, yet accessible hobby, but at the same time it is a prestigious and fashionable hobby all over the world.
For many centuries, people have continued to practice archery. Once necessary for hunting, today it is also used for sports and entertainment. But few people thought, looking at this weapon, that it has practically not changed since our ancestors invented it. This is the same bowstring stretched on an elastic rod and pointed arrows.
Buying a sporting bow can be quite expensive, and not everyone who wants to buy one is an athletes or hunter. Perhaps this is your hobby in your free time from work, you want to pick up arrows and try to hit the target, or maybe you want to get a bow for your child and play Indians with him. In this case, the best solution would be to make your own bow and arrows. This is a truly exciting and creative process, no less interesting than the shooting itself. In addition, an undeniable advantage of a homemade bow will be the ability to save your budget from a serious blow. So, let's figure out how to make a bow and arrow with your own hands.
Materials for making your own bow
The bow itself can be made from various available materials:
- Tree. The most popular and, perhaps, reliable option for self-production. A bow made from wood will be strong and durable. The best species are considered to be ash and white acacia; you can also use maple, oak or poplar. At the same time, the stick should not have knots, shoots, cracks or other defects. Coniferous trees cannot be used.
- PVC pipe. Another material that can be used to realize your idea.
- An unusual, but quite suitable material can be ordinary skis. To be more precise, the upper sections of the bow arms are made from skis.
- Plywood, just like skis, can be an option for bow limbs.
- Even an old car spring can be used for shooting.
- For a small toy, you can use, oddly enough, ordinary paper.
The next element of the bow is the string. It is important to understand that the choice should be on a durable, elastic material that can withstand high pressure. Suitable options for her:
- Polypropylene rope
- Nylon thread or cord
- Nylon thread
- Twine or regular thin fishing line
- Thin climbing sling
Of course, we can’t forget about the arrow! The best choice of material for its manufacture would be wood. As a rule, these are birch and pine branches, slats or boards. Processing birch is somewhat more difficult, but the result is better.
The arrow tip must be made sharp so that it can pierce the target. For a simple option, a nail wrapped in wire may work. For a more serious approach, use a thin steel tip.
Don't forget to glue feathers or make grooves for your fingers at the end of the arrow.
What do you need to know before you start?
Even if you are making a bow and arrow for fun or as a gift for a child, there are certain dimensions that you should consider:
The classic version of the bow consists of:
- The main part, i.e. the handle
- Shoulders
- Bowstring
After production, the bow must be properly cared for. Don’t be alarmed, maintenance is simple and won’t take much time:
- Onions should be stored upright.
- The bowstring is put on only when shooting, and then immediately removed. Before shooting, you need to “spring” the bow and string in order to develop it.
- The bow cannot be overstretched.
- Store only in a dry place, preferably with a case.
DIY bow and arrows made of wood
Wood is perhaps the best and most affordable option for making a bow. To do this you will need:
- Drill
- Axe
- Jigsaw
- Metal scissors
- Sandpaper
- Regular file and file for working with wood and metal
- Slipway
- Plane
To make a bow you will need time and patience.
- First we need to find a branch that matches the parameters. This is best done on a frosty day. It is important that the selected branch has as few growths and small shoots as possible, and the length is at least 180 cm.
- There is no need to touch the bark. And the sawn ends need to be coated with oil impregnation for wood or a special varnish.
- Leave the base of the future onion to dry for a couple of months, placing it vertically in a room with a temperature of 20 to 28 degrees.
- It is necessary to give the workpiece a rectangular shape; this can be done using a well-sharpened knife and a sharp ax.
- Steam both sides of the onion at the same time over boiling water.
- To give it a bend, we place the freshly steamed workpiece in a slipway for two weeks.
- When placed in the slipway, the bark should come off, but if this does not happen, then at this stage, carefully peel it off with a knife.
- Cover the product with wax.
- We make notches for the bowstring only after drying.

We need to pull the string onto our future bow. It's not at all difficult to make. You will need the following materials:
- Silk or nylon (No. 10) thread
- PVA glue
- Rubber glue
- Moisture protection, e.g. wax
- Board
- Thick nails
You need to take two short round pegs with a thickness of 20 mm or more. On a board whose dimensions are 200*40*40, in accordance with the distance of the bowstring, we drill two holes and install pegs. The next step is to wind the thread for the future bowstring onto the spool. Wrap a thread around the pegs, which will be used as a base. 3 turns are enough. Tie the ends of the thread tightly and coat with PVA.
Spread rubber glue directly onto the nylon thread, and coat it with PVA when winding. Make the winding as tight as possible. Make loops at the ends to pull the string over the shoulders of the bow.
Before you pull the string directly onto the shoulders of the bow, bend it slightly 15 times. This will allow the product to get used to the movement.
You can't do without arrows either. Since we are making onions with our own hands, let’s look at how they are made. At a minimum, we need 4 arrows.
You will need for the future arrow:
- Slats or boards about 3 cm wide and 85 cm long

Manufacturing process:
- Using a plane, narrow the workpiece (slat or board) to 1.5 cm.
- Saw it into 1.5 cm squares on each side.
- Using sandpaper or a grinding machine, give it a round shape with a diameter of no more than 8 mm.
- We can also attach feathers. Crows are best suited for this. Cut the feather in half and tie it to the end of the arrow using thread.
- It is better to buy a tip in a special store. You can make it yourself by cutting it out of a thin sheet of iron or by attaching a sharp nail with strong fishing line.

Homemade bow from PVC pipe
Despite the fact that wood is the most suitable and affordable material option for a bow, it can also be made from PVC pipe. Making a wooden bow takes a long time, but working with a pipe will require much less.
You will need:
- PVC pipe
- Construction hair dryer
- Metal knife
- Whetstones
- Molding board
- Slipway
Manufacturing process:
- First, you need to select a pipe.
Please note that we require PVC pipe, not PP or PE.
- Mark the center in the middle of the future onion and set aside 6 cm from it in each direction. This will be the handle.
- Also, you need two blocks as high as a pipe.

- Now you need to heat one limb of the bow using a heat gun until it becomes evenly soft.
- Lay the molding board and secure with clamps.
It is important to remember that the board rests on blocks near the handle.
- The board is removed after the pipe has cooled.
- The same thing is repeated with the other shoulder.
- Next you should move on to forming the handle. It also heats up and forms in a plane perpendicular to the compressed shoulders.
The handle should be shaped to fit the palm so that it is comfortable to hold.
- You can't do without a bowstring. Therefore, the next step is to attach the bowstring. From the very edge at the end of the shoulder, retreat about 8 cm. Heat and bend at an angle of 60 degrees.
- After cooling, cut out the “holder” for the bowstring.
- We do the same with the second shoulder.
- For the bowstring, you can use polypropylene rope.
It is still better to choose wood as a material for arrows. To make them you will need planks or slats with a diameter of up to 15 mm. The making of arrows is discussed in detail in the previous version of the wooden bow. *****Instead of bird feathers, you can use reinforced tape***** !FIGURE 43 - “Arrow feathering”!
DIY bow from old skis
Skis- an excellent material for making onions. They have their undeniable advantages: already prepared curved ends, while the bend of the shoulders is the same.
To work you need:
- Bolts, nuts
- Thick wooden block
- Nylon thread or some other low-stretch material
- Drill
- Scarring
- Hacksaw
- Hammer
- Chisel
- File
- Sandpaper
- You may need a band saw and plane
Work process:
- First you need to make a handle template. It is important to understand that it is necessary to take into account the place for gripping by hand and the presence of flat surfaces at a slight angle for attaching skis.
- We transfer the finished template to a block and carefully cut out the future handle.
- Skis can be very long and not the right size for the bow. Therefore, according to the parameters given at the beginning of the article, the length of the bow is calculated, and the extra piece from the length of the skis is cut off.
- The shoulders made from skis are attached using bolts.
- Next, you need to cut out the recesses for the bowstring. The edges must be rounded, otherwise the bowstring may rub against them.
- If the selected thread is too thin, it is advisable to intertwine it. This will give it additional density and extend its service life.
- Arrows are made similarly to previous versions of the bow.
That's all, the bow from old skis is ready for shooting.

DIY bow and arrows from rebar
To do this you need the following:
- Fiberglass reinforcement with a diameter of 8 mm and length
- Profile pipe 20 cm long, with a cross section of 20*25 mm
- Plywood, 40 mm thick
- Steel cable for bowstring, diameter 1 mm
- Furniture bolts
- Clamps
- Thick thread
- Heat shrink tubes for decoration, you can do without them
Manufacturing process:
- For each arm, it is necessary to prepare two pieces of reinforcement 50 cm long and one 70 cm long.
- Fold the reinforcement together so that there is a long piece in the middle and wrap tightly with synthetic thread.
It is important to do this along the entire length so that the pieces of reinforcement become a single whole.

- Then you need to saturate the shoulders of the future bow with epoxy resin.
- For beauty, you can prepare a heat shrink tube. Put it on your shoulder and blow it with a hairdryer. Do the same with the second shoulder. It is possible that this may cause a slight decrease in the elasticity of the shoulders, and this procedure does not provide anything other than a decorative function.
- Then you need to cut the profile pipe lengthwise. Measure the middle, and after making cuts, fold it in half. Next, you need to drill holes and, using bolts, compress the resulting boxes. The picture shows what should happen in the end.

- Without delaying your shoulders, you can immediately make holders for the bowstring. To do this, just step back 1 cm from the edge of the shoulders, wrap the wire and reinforce it with electrical tape. You will get a kind of tubercle for fastening.
- It is better to make the handle from wood.
Do not use softwood as it will not withstand the load. Oak will do. Or you can get by with plywood at least 4 cm thick.
- Cut out a handle blank according to the template you selected on the Internet. Sand and paint.
- Using furniture bolts, connect the arms and handle of the future bow.
Then you need to move on to making the bowstring. It can be made from a steel cable with a diameter of 1 mm. Secure the loops using crimps, and stretch the shrink film over the entire length of the cable.

Arrows can be made from window beads and tape. Using a plane, plan the glazing bead and use tape to make feathering. Instead of a tip, it will be enough to sharpen the arrow and dip it in paint. This bow cannot be used for hunting or professional shooting. But it's perfect for outdoor fun!
Homemade bow from a car spring
If a car spring is suitable for creating a crossbow, then why not try using it as a material for a homemade bow? Anything can be at hand, and you shouldn’t neglect it.
To work, you will need a car spring, for example, from an old Lada or Muscovite, and a sharpening machine.
- The spring needs to be ground off. The narrower it is, the more pliable the bow will be. At the same time, it is necessary to ensure that the arms of the bow are the same.
- The handle can be made of paralon. To do this, you need to cut a piece of foam and tape it to the spring using electrical tape.
- Toward the ends, the arms of the future bow need to be narrowed even more using a sharpening machine, and shallow notches for the bowstring must be made.

Now let's move on to making arrows. This requires thin reinforcement. It must be ground down, but in such a way that it does not lose its elasticity and does not bend. On one side the arrow is sharpened a little sharper, and on the other side a plastic feather is attached. A linen cord is suitable for the bowstring.
A bow made from a car spring is very tight and may not be suitable for everyone. But it will be an excellent tool for developing arm strength.
When using this version of a homemade bow, do not forget to wear thick gloves so as not to injure your hands.
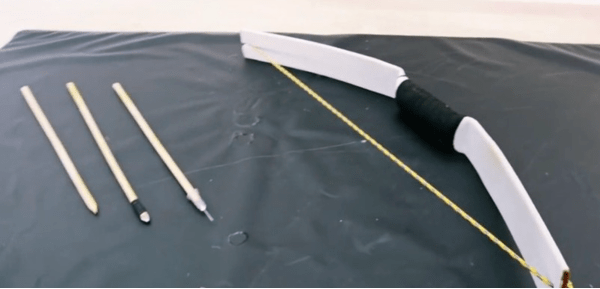
Homemade paper bow
This option also has a right to exist if you have paper at hand and a desire to shoot. Of course, it is not suitable for hunting, but it is suitable for fun.
You will need:
- Paper
- Scissors
- Pen refills
- Scotch
- Rope
- Cocktail straws
How to make a paper bow:
- Cut a square shape from a piece of paper.
- Take 2 identical pen rods.
- Wrap one of the rods in square paper. Then, twisting the workpiece from the corner, make sure that the paper fits tightly. Secure with tape. Do the same with the second rod.
- Gently wrap the paper not all the way. There should be a couple of cm left free. It is necessary to squeeze these ends so that they become flat.
- Place them on top of each other and secure tightly with electrical tape.
- For the bowstring we attach an elastic rope.
For arrows, you can use cocktail tubes, wrapping them in the same way with electrical tape.
That's all. Paper bow and shells are ready!

It doesn't matter what kind of bow you want to make. Whether it's Elvish, Asian, short or something else, it's important to stick to the basic rules and then everything will work out!
The bow is a beautiful weapon, known to man since ancient times and still popular not only among romantic teenagers, but also among athletes, as well as hunters. The choice of such weapons is amazing. You can purchase this accessory in a store, or you can make it yourself, if you wish. And today we will tell you how to make a classic, compound and hunting bow with your own hands with arrows at home.
How to make a classic bow with your own hands
This type of weapon works by transmitting a pushing force to the bowstring through the straightening shoulders, which causes the arrow to fly out at a certain speed. This speed depends on the tension force. Popular models in this category are the Mongolian, Bear Archery Supermag and Deer Master.
What you will need
You need to prepare:
- Plane.
- Hacksaw-saw.
- Insulating tape.
- Knife.
- Jigsaw (for compound bow).
- Drill (for compound bow)
- Glue.
- Sandpaper.
- Varnish, finishing paint.
- M6 bolts (for compound bow).
- Material for the bowstring (fishing line, synthetic rope or silk thread).
- The material for the bow is a PVC pipe or wood (yew is best, you can also take ash, juniper, cedar, willow, walnut, rowan, larch, elm).
DIY classic bow
Technologies
Option one
The easiest way to make a one-piece bow is to take a PVC pipe 4 centimeters thick. The length is measured based on the distance between the ends of the fingers in an extended state and the middle of the thigh. Notches are made at the ends of the pipe where the bowstring is attached.
The product is not very durable - it will only last a few times.
Option two
This is a composite model that will require some tinkering. But the structure will be more durable and reliable.
- Here you first need to cut out the central part (base) from wood, to which the shoulders will be attached. The width of the base in the center is 5 centimeters, and at the edges - one and a half centimeters. The block for the workpiece has dimensions of 40 by 4 by 6 centimeters. Material – oak or birch. You can glue a blank from several layers of maple, beech or other wood.
- We make the shoulders from the same PVC pipe and reinforce them with pieces of smaller diameter pipe inserted inside. We make notches at the edges, where we attach a bowstring woven from silk thread.
You can also make shoulders from ready-made spring slats taken from a sofa or bed. The length of these elements usually ranges from 70 to 120 centimeters. The optimal thickness is 12 centimeters. Cut out the parts obliquely (preferably two at once). Notches are made on the edges for the bowstring with a depth of 7 to 8 millimeters. The arms are connected to the base with M6 bolts (for which holes must be drilled).
It's even easier to make shoulders from skis - they fit perfectly. It is best to take narrow skis, but wide skis will have to be sharpened. Both plastic and wooden products are suitable. In this case, the total length of the bow should be from 120 to 140 centimeters.
Compound Bow
These models differ from the classic ones in that due to the presence of eccentric blocks, less effort is required when shooting. And accuracy and accuracy, as well as firing range, increase. Block models such as MK-CB50, Condor PKG, Orion, Hawk and others are popular among athletes and hunters.
What you will need
A very simple option requires:
- Two powerful springs (you can buy them at the car market).
- Two metal wheels (parts of a car lift, also bought at the car market) and two metal pins 4 centimeters each (will be the axles).
- Eight furniture corners and two corners of 4 centimeters each.
- Two furniture hinges.
- Four metal brackets in the shape of the letter “P” (attach the wheels).
- There are 30-35 regular self-tapping screws and 4 extended ones.
- Synthetic ropes (strings).
- Wooden blocks 46 centimeters long (2 pieces for the shoulders), 40 centimeters long, 4 centimeters wide and 2 centimeters thick (2 pieces for the base) 16 centimeters long and the same length and width with grooves along the edges (2 pieces for attaching springs) .
- Hacksaws.
- Jigsaw.
- File.
- Screwdrivers.
- Sandpaper.
DIY compound bow (drawings)

Technology
We make the base by attaching two small, sixteen-meter bars along the edges of a forty-centimeter bar. We use corners for fastening. We strengthen the structure with long self-tapping screws. Bring the surface smooth with sandpaper. We attach wheels to the shoulders using U-shaped brackets (for which we make slits at the ends of the arms). The axles will be the studs.
We attach furniture hinges (curtains) along the edges of the base. We paint all the parts (spray paint is best, it dries quickly). Then we attach the shoulders to the hinges (in the middle), and screw the corners to their front part from the end. We will hook the springs onto them, the other end of which will hook onto the recesses in the base bars. All that remains is to tighten the bowstring.
Below we will tell you how to make a hunting bow with your own hands at home.
Hunter bow
Modern bows for hunting can be simple (solid) and composite, recurve and block, having different lengths and power. The cost of some ready-made branded models is quite high, so we’ll tell you how to make a hunting bow yourself. Moreover, in “field” conditions.
A simple hiking option
What you will need
- Durable wood (cedar, spruce, bird cherry, pear, apple, elm, pine, birch, larch).
- The knife is sharp and comfortable.
- Animal fat.
Technology
- We choose a suitable flexible branch in the forest.
- We try it on for size, placing one end to the thigh, the other to the end of the outstretched arm.
- We clean the bark and cut out the desired shape.
- In the middle we make the thickness 5 centimeters, at the edges - 1.5 centimeters.
- For the bowstring, the grooves are 1.25 centimeters from the ends.
- Rub the finished product with animal fat.
DIY hunting bow

Composite model
What you will need
- The wood for the base (otherwise known as kibiti) is single-layered, dense, and not flexible. It's best to take it close to the root of the tree.
- For the shoulders (aka, horns), we take bird cherry growing near the water.
- For the bowstring - a cord, a leather strip three millimeters wide, or twisted nettle stems.
- For gluing parts, use glue made from crushed fish heads.
- Birch bark, a plate made of spruce “Kremlin”.
- Animal fat.
- Knife.
Technology
We clean the workpieces from the bark and dry them well in a dark place. After rough processing, a second drying is carried out. When all the parts are cut out, they are dried in the sun. If you want to shoot from the knee, then one horn (shoulder) is made shorter. If this is not expected, we make them the same. The edges of the bow can be up to 1.5 meters. The dimensions of the base are the same as in the composite model described above.
The parts are glued together with fish glue and secured with animal tendons for strength. The base is impregnated with fat (or cedar resin). Inside the onion we paste a plate of spruce “kremlin”, on top - from warm birch bark, boiled and softened (we place the fibers lengthwise). All that remains is to attach the bowstring.
As for arrows for a hunting bow, they are made with a diameter of 6 millimeters, from wood without cracks. Bird's flight feathers are inserted into the back part.
Light wood is suitable for small game, hard wood for large game.
If you want to hunt birds, just sharpen the tip of the arrow. If you have your eye on something larger, make a tip. Metal, bone, silicon.