Organic soils, including wetlands, are considered the least suitable for capital construction. This is due to the high moisture saturation of the soils, their looseness, and tendency to deformation. However, modern foundation construction technologies make it possible to achieve the stability of the structure and its durability even in swampy areas.


Peculiarities
A feature of swampy soils is their tendency to deform, instability due to the large number of fine-grained particles, and high moisture saturation rates. During the off-season period, such soils are subject to severe heaving, and in winter – freezing. High moisture content in the soil causes the formation of dangerous quicksand. All this becomes the reason that soils have little resistance to compression, and it is necessary to look for non-standard solutions for foundation design.
In each specific case, the decision in favor of one or another system is made based on soil analysis, soil layers directly under the construction site, groundwater level. The well drilling method is used as a way to obtain the necessary data. It is recommended to do them in winter, when soil moisture saturation indicators are maximum.
The peculiarity of building a house on marshy soils is not so much the difficulties associated with the technical difficulties of construction, but the labor intensity of geological surveys, organizing drainage and other additional work.


Swampy soils include all types of highly compressible soils:
- clay soils with a porosity of about 52% and loams with a similar indicator of more than 50%;
- loose sandy soils and sandy loams, characterized by high water saturation and porosity over 41%;
- peaty (containing less than 50% organic soils) clay and sandy soils;
- silt is a highly porous (up to 60% porosity) soil containing a large amount of moisture and formed under the influence of microbiological processes in water bodies;
- sapropel is a type of sludge containing a high percentage of moisture, having a porosity of more than 75%, containing less than 10% of organic components.


Under highly compressible swampy soil there is always weakly compressible soil suitable for construction.
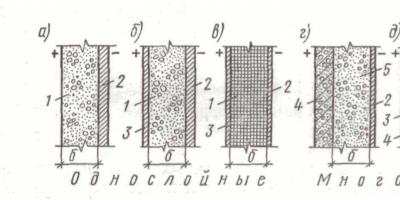
Several foundation systems are most common in wetlands.
Strip foundation with powerful drainage from the basement and drainage
In some cases, this type of foundation can be used on swampy soils with a high content of coarse sand, provided that there are no aquifers under the foundation, as well as springs and other sources nearby.

Pile foundation
Most often, this type of foundation is the only possible option for swampy areas. It is suitable even for soils that are eroded to a wet pulp. In such cases, the piles rest on solid layers of soil at the bottom of the swamp.


Floating foundation
It is a monolithic slab that can change position along with the soil, but not deform. Due to the design features, such a system has another name - a slab base.
Suitable for unstable viscous and dense soils, but only on condition that they are not flooded by seasonal floods or precipitation.


Installation features
Regardless of the chosen foundation construction technology, its installation on weak, moving layers is unacceptable.
To strengthen them, the following methods are used:
- peat removal - that is, the replacement of weak (prone to heaving) soils with a non-heaving layer, for which, under the foundation, part of the moving layer or its entire thickness is replaced with a cushion of denser layers;
- soil compaction under the foundation;
- creating an embankment from non-heaving soils for building a foundation on it.
When creating a foundation in a swampy area, it is important to make the foundation in such a way as to reduce the specific pressure of the object on the ground and thereby prevent its settlement.


With all the variety of construction options, careful analysis should be carried out. It is better to draw up several drawings and estimates for different construction options. As a rule, for the same area, you can choose at least 2 design options, for example, excavate the entire depth of soft soil and install a strip foundation, or create an embankment and combine it with a pile foundation. Project documentation will allow you to see the strengths and weaknesses of each technology, the cost of objects and make the best choice.
It is important what material the house is built from. For the type of soil under consideration, it is better to use lightweight building materials. The construction of a support for a wooden house or a frame object will cost less and be less labor-intensive.
In addition, the elasticity of the wall material should also be taken into account - in the event of possible soil deformations, wooden structures will retain their integrity to a greater extent than, for example, fragile aerated concrete.


Strip foundation
Usually, owners of plots located in a river floodplain or lowland resort to its construction, so waterlogging is associated with the proximity of a water source.
As a rule, in this case, a classic strip foundation is used, performing the following types of work before its installation.
- organization of a powerful drainage system using hydraulic drainage barriers, preventing the penetration of moisture into the site;
- the perimeter around the foundation should be equipped with highly efficient soil drainage, ensuring that this system adjoins directly to the base.
For construction, you should choose the highest point on the site. At the stage of geological surveys, you should make sure that there are no underground springs characteristic of such an area. If any are found, the use of a strip foundation should be abandoned.


But even if such sources are not discovered, only small one-story houses, mainly made of wood or frame-type analogues, can be erected in swampy areas under a strip foundation.
After digging a trench, you should first create a sandy and then a soil (from non-heaving soil) “cushion” in it, organize formwork, which is filled with concrete mortar. It is unacceptable to use a strip foundation made of blocks in a swamp.
If the house is built from concrete blocks, then the masonry is reinforced, and a monolithic reinforced concrete belt is installed at the floor level.

Pile foundation
Suitable for building even large (one or two storey) houses from heavier materials (cellular blocks, brick, hollow stone) in swampy areas. This property is due to the high load-bearing capacity of reinforced concrete foundations, which rest on rocky or hard soil layers, usually located at the bottom of the swamp. When there are differences in relief height, bases of different heights are used.
As a rule, the depth of laying supports is at least 6-7 m, drilling technology is used. This means that you won’t be able to do the installation yourself; you will need to use special equipment. This factor, as well as a number of others, determines the higher cost of a pile foundation compared to a strip foundation in swampy areas. On hard soils, a strip foundation is significantly superior to a pile foundation in terms of its labor intensity and cost.


In rare cases, the depth of hard soil layers is 2-3 m, then screw piles can be used instead of bored piles. They are less expensive and can even be installed by hand.
When organizing a pile foundation, the top layer is usually removed to a depth of 60-70 cm, and road geotextiles are laid instead. The latter is filled with a sand-crushed stone mixture. The pile heads are connected by a grillage or double channels.


Slab foundation
If there is a hard top layer of soil, which is often found on peat bogs and lake remains, it is much more rational to install a slab foundation. Its main advantage is its high strength and lack of tilting even with significant soil deformations or rises in groundwater levels.
The most difficult type of foundation for a house is traditionally a swamp foundation. Therefore, a limited number of construction technologies are used that can compensate for the inevitable annual settlement of the building and the forces of frost heaving.
Without soil reinforcement, a pile-screw grillage is usually used. For a floating slab, you will have to replace part of the soil with non-metallic material. If you sacrifice time, you can drain the site using the loading method with simultaneous vertical drainage (2 - 3 years) in order to support the building on a strip foundation.
When surveying a wetland, recommendations for surveys on soft soils are used. The main difficulties are:
- the presence of weak strata, a layer of roots/vegetation;
- abundance of water on the surface, in the lower horizons;
- uneven mineralization, ash content.
In normal condition, the moisture content of peat is 150–300%, so already during construction, the foundation in the swamp will begin to sink under its own weight. The problem can be solved in several ways:
- passing through unstable horizons, resting piles on layers with sufficient bearing capacity, manufacturing slab, lattice prefabricated or monolithic grillage along their heads;
- increasing the supporting surface of the foundation (slab), pumping out water, partially replacing peat bog with crushed stone over a layer of dornite, geotextile;
- draining the area with vertical drains while simultaneously increasing the calculated soil resistance by loading the building area with non-metallic material from above, after which it is possible to fill in a monolithic MZLF with provision of measures to eliminate swelling.
Only a specialist can determine which method is best for a particular project. An individual developer will not be able to do this due to the lack of construction practice and specialized education.
Soils in the swamp
A complex of geological surveys costs about 30,000 rubles. Therefore, individual developers often neglect them, independently digging holes in the building spot to a depth of 2 - 2.5 m to study the soil. If you include a pile-screw foundation in the project on marshy soil, you can save this amount:
- It is enough to buy a pile for trial screwing;
- immerse it in 3 - 4 places on the site to get an idea of the depth of the bearing layer.
The method is called test screwing; it must be done manually; when the pile reaches dense soil, this is reflected in a sharp increase in the torque required for further screwing of the pile.

- in the first case, the thickness of the foundation is 30–40 cm, the structure is reinforced with two meshes of 8–16 mm rods, clamps of 6–8 mm rods, maintaining a 5–7 cm protective layer;
- the stiffening ribs of the USP are reinforced with frames connected to the main reinforcement meshes, the thickness of the foundation is reduced to 10 - 15 cm (excluding stiffening ribs), in addition to the lower thermal insulation layer (EPS polystyrene foam 10 cm in two layers), the contours of a warm floor are embedded in the upper part, the surface sanded after reaching 50% hardness.

To prevent the foundation in the swamp from being subjected to heaving forces and freezing, the side edges and blind area are also insulated with expanded polystyrene. Swampy areas are characterized by flat terrain, so the slabs are not subject to lateral shear loads.
Pile-screw grillage
Technologies for the design and manufacture of pile foundations are regulated by SP 24.13330 of 2011. The main difficulty is choosing a reliable manufacturer of screw piles. Many small companies produce them “on the knee”, using used or seam pipe, which is a serious violation of technology.
In the absence of lathes, it is extremely difficult to align the SHS tip with the axis of the tubular body. Therefore, when driven, the pile loosens the soil instead of compacting the soil. The load-bearing capacity and resource of the cottage are reduced, respectively.

Stilts have no restrictions:
- the relief of the swamp is 100% flat, so either immersion with an electric drill with a multiplier is used;
- the tightening force is controlled quite simply, so the piles rest on layers with normal bearing capacity;
- for tying the heads, a wooden (log house, frame, SIP panels), metal or monolithic (brick, concrete walls) grillage is used
The foundation in a swamp must be protected as much as possible from aggressive environments. Therefore, if the anti-corrosion protection of SHS is insufficient, the outer surface should be additionally coated with special compounds. The most reliable is hot-dip galvanizing, which has a self-healing effect.
Loading method
The inert material squeezes water out of its own gravity into vertical drains, gradually settling to the design level, compacting the loose soils underneath. After 6–10 months, it is possible to build a strip foundation using standard technology.
Thus, in swampy areas it is possible to build a grillage pile-screw foundation or a floating slab. Or drain the area with vertical drains and load the building area with inert materials for the construction of a strip foundation.
Any construction begins with a layout on the ground. Once the master plan has been drawn up and the necessary materials and tools have been purchased, you can begin. If the construction of a house is carried out in a place with a high groundwater level and is characterized by deep freezing, then the most suitable option would be.
To make a columnar foundation, it is necessary to remove a layer of soil approximately 2-5 meters in all directions from the planned location of the foundation.
When laying a foundation in a damp area, high-strength concrete solutions are used, and load-bearing concrete pillars are reinforced with metal rods and thick wire, and ready-made concrete blocks are used.
To perform, you will need the following tools:
- construction tape;
- plumb line;
- linen cord;
- level;
- wooden pegs 50 cm;
- square
For excavation work you will need the following tools:

- pointed shovel;
- a shovel having a straight cutting part;
- pick;
- spade.
Masonry tools:
- jointing;
- hammer;
- mites;
- brush and brush;
- mortar box;
- trowel;
- concrete mixer;
- rake;
- barrel, watering can, bucket;
- graters;
- tamping;
- chisels
Return to contents
Construction of a columnar foundation
The most common type in private construction is a reinforced concrete monolithic columnar foundation. The technology for its creation can be considered in stages.
- Preparatory work

First, the construction site is cleared. To do this, cut off the plant layer of soil (10-30 cm) at least 2.0-5.0 meters in all directions from the planned location of the foundation.
If the soil under the cut layer consists of small stone and sand (medium- or coarse-grained sand, gravelly sand), then it is used as a base for the foundation, regardless of the freezing depth, humidity or groundwater level.
If the soil is clayey (loam, clay, sandy loam), then you need to make a sand and gravel cushion. Its thickness depends on the geological characteristics of the soil.
Silty or peat soils under the cut layer indicate that a complete replacement of the base and advice from a geologist on the design and composition of the artificial base are necessary.
The construction site is cleared of debris and foreign objects. After this, horizontal planning is carried out, and the mounds are removed and soil is poured into the pits. The horizontality of the area is checked with a level by placing it on a 2-meter flat strip or board. Preparation is completed after the delivery and storage of construction materials on site.
- Foundation breakdown

Layout of the plan is transfer from drawings to the site and securing the main axes. In front of the house, cast-offs (pillars) are installed around the perimeter at a distance of 1 or 2 meters from the building. From the side of the planned walls of the house, parallel to them, wooden slats or boards are nailed to the pillars at a level, onto which the dimensions of the individual elements of the pit (pits and trenches), future walls and the foundation itself are applied. Control the layout of the center lines using a tape measure.
It is mandatory to check the corners of a rectangular foundation. Using a theodolite, it is necessary to check the markings of the bottom of the trench, especially at the corners of the house and at the points of intersection of the tapes. It must correspond exactly to the design (if it was decided to deepen the foundations by 1.4 meters, then the bottom of the trench will be 1.4 meters below the zero level of the house).
Return to contents
Next stages of construction
- Digging holes for the foundation
Rectangular holes are dug by hand or with an excavator. They must be located strictly along the axes. Pits with a depth of less than 1 meter can be made with vertical walls, without installing fasteners. If the depth is more than 1 meter, fastenings are made from slabs (boards) or with slopes. The hole is dug 20 or 30 centimeters deeper than the foundation and made wider than the foundation, 20 or 40 centimeters in each direction, to install the formwork and spacers. The foundation must be no less than the width of the walls being built. A gravel cushion is placed at the bottom 10-20 centimeters wider than the foundation on each side. It is generously moistened with water and compacted. Ruberoid or polyethylene is laid on top to maintain the moisture content of the poured concrete.
- Installation of formwork

The formwork for the foundation is made of boards, planed on one side (the planed part is installed on the concrete). The wood can be of any species with a moisture content of up to 25 percent. The thickness of the boards is 25-40 mm, width – 120-150 mm. Wide boards are not suitable for formwork, as cracks will form during installation. You can use metal structures, particle boards, and waterproof plywood.
Wooden formwork is preferable, as it has less adhesion to concrete. The disadvantages of wooden formwork include hygroscopicity and the possibility of deformation. The formwork is installed exactly perpendicular to the base of the foundation and close to the walls of the pit.
Concrete can be poured without formwork if the walls of the pit are dry and not crumbling. In this case, polyethylene is laid around the perimeter.
Ceramic, asbestos and iron pipes can also be used for formwork. The internal diameter of the pipes can be from 100 mm or more, it depends on the design of the building. Concrete is poured into pipes and left in the ground along with the foundation.
When constructing wooden formwork, you must remember that the boards must be damp, so they are well wetted. Otherwise, dry boards will absorb water, and this will negatively affect the strength of concrete.
Return to contents
How to install formwork when creating a columnar foundation
It’s good if it is possible to use ready-made panel formwork. This formwork has many installation options, and this is convenient for those that have a large number of angles. The panels of inventory formwork can be flexible or rigid, length – 0.5-3 m.
- Installation of columnar foundation reinforcement
The pillars are reinforced with longitudinal reinforcement with a diameter of 10-12 mm; after 20-25 cm, clamps with a diameter of 6 mm are made. The longitudinal reinforcement is installed vertically and wrapped with annealed wire or clamps. It is advisable to ensure that the reinforcement exits 10-20 cm above the top of the foundation, so that the reinforcement can then be welded to them. Concrete is laid in layers of 20-30 cm.
The grillage is made in the form of a prefabricated or monolithic reinforced concrete rand beam.

After creating a columnar foundation, you need to check the upper level marks and level them, if necessary, with cement mortar with a 1:2 composition. Then a prefabricated, precast-monolithic or monolithic reinforced concrete grillage (belt) is installed. A foundation with a monolithic belt has proper stability and longitudinal rigidity. Before arranging the belt, the boron jumpers must be firmly connected to each other. To do this, tie the mounting loops crosswise with wire twist or connect by welding scraps of reinforcement with a diameter of 8-10 mm.
Then they arrange formwork on top of the lintels, make a reinforcement cage and lay M200 concrete. The concrete surface must be leveled and covered with waterproofing material. After the waterproofing is installed and the concrete mixture has gained strength, they begin to install the floor slabs.
Return to contents
Foundation waterproofing
When arranging a columnar foundation, in order to insulate the underground space and protect it from snow, debris, moisture, dust, etc., they build a fence (enclosing wall between the pillars). It can be made from different materials, but most often it is made from brick or stone. To create a fence between the foundation supports, a concrete screed is made as a base.
A concrete screed without deepening is placed on a sand cushion with a deepening of 15-20 cm. When installing a concrete screed, a reinforcement frame and formwork are required. The screed is laid on a concrete screed. In the entryway, as in the basement, technological windows are made to provide communications. The pick-up is not connected to the supports, since uneven settlement leads to the formation of cracks. Its height should be made at least 40 cm. The effect of moisture on the walls of the house depends on this; the higher the fence, the less the effect of moisture on the walls.
In order to do this, there are several ways:
- The upper part of the supports and the fence are covered with a layer of bitumen. A strip of roofing felt is laid on it and a layer of bitumen is applied again, then the next strip of roofing felt is laid;
- The upper part of the supports and the fence is covered with a layer of cement mortar with a ratio of 1:2. Sprinkle it on top with a layer of dry cement of 2-3 mm. After the cement has set, a strip of roofing felt or roofing felt is laid.
The foundation on a swamp and peat bog for building a house is a very difficult case. It is very difficult to build a house on peat, but... it is not impossible for a builder. What is bad about swampy areas and peat bogs is the presence of swampy soils that are oversaturated with moisture, containing both organic matter and a fine-grained structure. All this contributes to the formation of both true and false quicksand. All swamp soils swell in winter, and in spring groundwater rises and is washed away. The thickness of layers of weak marshy soils often turns out to be too large, and the construction of pile foundations can become not only uneconomical due to the deep occurrence of a layer of dense soil, but also technically impossible for a private builder.
Types of foundations in swamps and peatlands
If the swampy soil is no more than two meters thick, and geological studies have confirmed this, a foundation on bored piles or using TISE technology, similar to foundations on small quicksands, will be more economical. The depth of the piles in this case is assumed to be below weak swamp soils (but not above the GPG), the condition of supporting the pile on hard layers of soil is mandatory. Broadening - the heel at the ends of the piles does not allow the forces of frost heaving to squeeze them out of the ground. The strapping device - a grillage on the top of the piles - reduces horizontal movements and imparts rigidity to the foundation structure.
For foundations with any depth of marshy soil, a monolithic floating slab is suitable. This is the only foundation that, due to its design, does not fight with the foundation soils, but moves with them. A solid slab rises and falls with the horizontal movement of soil, keeping both its structure and the structure resting on it intact.
But this does not negate the need to reduce the influence of groundwater on the slab. Creating a high cushion of sand, ASG or crushed stone is a prerequisite for reliable operation of the foundation. The cushion performs several tasks - it serves as a drainage layer, a shock absorber and distributes uneven loads from the foundation soil onto a monolithic slab.

Slab foundation technology on a pillow
Clearing the construction site, removing debris, cutting off the top layer of plant soil, if any. It is better not to do deepening, so as not to create conditions for flooding. The bottom layer of the pillow is often made from construction waste - scrap concrete, stone, etc., since a lot of material is needed. The height of the pillow should be at least a meter. The best material is flaky crushed stone of large fractions. After backfilling, the pillow must undergo a period of self-compaction - at least a year. Mechanical compaction of crushed stone is only possible by rolling heavy equipment.
The crushed stone surface is planned and concrete preparation is made from M100 concrete with a thickness of 100 mm. The preparation serves only to level the base for the slab insulation, so it can be done either from lean concrete or from mortar. The preparation is left until completely set - from a day to three, depending on the air temperature.
Installation of a thermal insulation layer made of slab insulation - extruded polystyrene foam or penoplex 100 mm thick. It is much worse to use polystyrene foam for this purpose, since it will not last long in a humid environment and under load. Thick geotextiles are laid over the insulation in one layer, with an overlap of 150 mm. Geotextile strips must be securely fastened by welding. This layer is needed to ensure the safety of the waterproofing.

Polymer diffusion film membranes are used for waterproofing. The properties of the membranes allow them not only to allow moisture to pass through from the foundation due to their structural structure and vapor permeability, but at the same time to block access to the foundation to groundwater and capillary moisture. The membrane is laid starting from the edge of the site, folds and distortions are eliminated. The strips are laid end-to-end with an air pocket and secured by welding, with a special welding machine for welding polymer roll materials. It is possible to use a hair dryer. The seam design is an overlap with an air pocket 20-25 mm wide, limited by two parallel continuous seams. Before checking the tightness of the seam, the ends of the pocket are welded.

To check the tightness and strength of the seam, you need a compressor, a pressure gauge with a valve and a hose with a needle. The needle is inserted into the air pocket and air is pumped to a certain pressure. The pressure for testing membranes up to 1.5 mm thick is 1.5 atm, for membranes 2 mm thick – 2 atm. The holding time is 20 minutes, during which time the pressure should not decrease. If a decrease in pressure is observed, the seam is welded again and the test is repeated. After the needle is pulled out, the puncture site is sealed with a “patch” of membrane material. The quality of waterproofing is one of the prerequisites for reliable operation of the foundation slab in conditions of high aggressive waters in wetlands.

Another layer of geotextile is placed on top of the membrane with the seams welded. A layer of thick polyethylene film is laid on the geotextile layer, gluing all joints with double-sided tape. A multi-layer cake made under the slab will perform several tasks: it will give it the opportunity to “slide” on the base, ensure its waterproofing and protect the concrete from local mechanical forces.
Installation of slab formwork. It is possible to use both wooden elements - boards and beams, and permanent polystyrene foam formwork, which will provide the slab with additional lateral thermal protection. The formwork is leveled and secured with struts made of timber or boards. To fasten wooden formwork, nails and screws are used, and the caps must be inside the formwork. The upper limit of the slab concreting is marked on the formwork. The formwork must be strong and withstand all the dynamics of concreting, pouring the mixture and its compaction. Before concreting begins, the formwork and all fastening elements are once again checked for strength and stability.

The reinforcing frame for a slab working on a soil foundation in swampy conditions is assigned increased strength. For working rods, only reinforcement of a periodic ring or four-sided crescent profile is used. The diameters and spacing of the rods are determined by calculation, depending on the weight of the house and regional wind and snow loads. The approximate diameter of the working fittings is 16-18 mm.
It is preferable to connect reinforcing bars using the knitting method, wire or plastic clamps. The volumes of knitting are significant and will require a lot of time, so it would be practical to purchase a semi-automatic hook. The lower tier of the working fittings is installed on clamps - plastic chairs. Fixation is necessary to maintain the protective layer. The use of wood, stone and other auxiliary materials as fixatives will reduce the cost extremely slightly, but will have a negative effect on the strength of the concrete slab. It is unacceptable to use bricks, especially silicate ones, as fixatives.

Continuous concreting of the slab is the main condition for its strength and durability. The slab must be poured in one shift, avoiding the formation of working (cold) joints. All slab seams are weak points and possible areas of deformation. Preparing concrete on your own in such volumes is hardly rational, and hardly possible. It is more practical to order ready-made concrete mix. To lay concrete you need equipment; if the slab area is large, perhaps a concrete pump. Laying is carried out with vibration using deep vibrators and a vibrating screed. Vibration is not completed until the release of air bubbles from the concrete mixture stops or cement laitance appears on the surface.

Maintenance of concrete is very important. Within 28 days, concrete conditions are created for hardening - they provide optimal temperature and humidity, as well as protection from mechanical influences, solar radiation and wind. The first day, before setting, the concrete must also be protected from rain. After setting, the concrete must be watered and protected from evaporation by covering it with water-absorbing material - geotextiles, burlap, and on top - with a thick plastic film. If there are significant differences in average daily temperatures, it is necessary to cover the concrete with heat-insulating material at night.

The optimal relative humidity for concrete gaining strength is 90 - 100%, temperature is 18⁰С - 20⁰С. At air temperatures above 25⁰C, concrete must be cooled by watering to avoid the appearance of temperature-shrinkage cracks. Concrete and all accessible surfaces of the formwork are watered, and watering needs to be constant, not periodic.

After 28 days, lateral waterproofing of the foundation and horizontal waterproofing along the top of the slab are performed. Before applying coating waterproofing, prepare the surface - remove dust, if there are holes and cracks, seal them with cement-sand mortar, then apply a primer or penetrating primer to improve adhesion, twice. After complete drying, coating waterproofing is carried out with bitumen or bitumen-polymer mastic. The side surfaces of foundation slabs cast in removable formwork are additionally thermally insulated with slab insulation - penoplex or extruded polystyrene foam with glue; less commonly, sprayed polyurethane foam is used. Thermal insulation in this case not only fulfills its direct function, but also serves as a protective layer for waterproofing, protecting it from mechanical influences, as well as additional waterproofing. Reliable waterproofing of concrete under conditions of foundation operation on marshy, water-saturated soils is a prerequisite for the durability of the slab.
A monolithic floating slab for building a house on a peat bog and marshy foundation is a reliable and proven option. Economically, a slab is one of the most expensive foundations, and requires both significant material and considerable labor costs. But in terms of operational reliability, a slab foundation has no equal, provided the correct work technology and the use of high-quality materials. And of course, it is better to entrust all calculations regarding the purpose of slab thickness and reinforcement density to specialists.

A foundation with a high groundwater level is one of the most complex and critical structures.
Such a foundation for a house must be built taking into account many different factors, each of which must meet all the requirements associated with the danger of flooding and premature destruction of the building.
Accordingly, it is important to correctly determine the level of soil freezing, select the most suitable foundation design and ensure the presence of an effective drainage system.
Determining groundwater levels and possible concerns
 Ground water level
 The construction of the foundation at a high groundwater level must be stable and reliable. The extent of the threat of subsidence and destruction of the building is determined long before the start of construction work. For this purpose, in the spring or autumn (at a time when the amount of moisture contained in the soil reaches its maximum level), in the place where, in accordance with the construction plan, the basement will be equipped, a hole should be dug at least 3 m deep.
 Dig a hole at least 3 m deep
 To obtain accurate data, you will need to reliably protect the pit from weather precipitation. After a few weeks, a certain amount of water will appear and settle at the bottom. Perhaps the bottom will remain dry, and then the foundation does not require additional protection.
If the water is located at a distance above 2 m from the surface, it is necessary not only to calculate the depth at which the foundation will be built, but also to choose the right design.
What should the foundation be like in case of high groundwater, experts can say after conducting geological surveys.
 Piles will raise the level of the house to a safe height
 Among the existing foundation structures on high-level groundwater, pile structures are especially popular and trusted by consumers.
Their arrangement will help ensure high-quality and reliable protection of the foundation of the house from the negative influence of groundwater:
- flooding of basements;
- destruction of concrete structures;
- the occurrence and development of fungus and mold;
- violation of the integrity of the foundation itself when freezing during the cold season.
 At high groundwater levels, the walls of the pit may float
 In addition, high groundwater level causes the walls of the pit to melt and a sharp reduction in the bearing capacity of the soil. This will require additional work to develop an effective drainage system, including wells and catch basins.
The most dangerous process is the leaching of minerals from the soil, which significantly worsens the strength characteristics of the soil and leads to a change in its structure. Installing a foundation in such conditions has a number of limitations. Calculation of the depth at which the supporting structure will be poured is carried out taking into account the qualitative characteristics of the soil:
- loams;
- sandy;
- clayey;
- mixed.
 The level of heaving and the depth of soil freezing depend on this. If the freezing depth is less than the ground level, then there is no need to make adjustments for soil characteristics when planning.
The calculation is carried out with adjustments for soil type and possible subsidence of soft soils.
The data obtained most often forces one to abandon the construction of a strip structure, since the associated work will be very labor-intensive and require significant material costs.
A variety of foundations and the correct choice of the desired design
 A slab foundation is suitable for clay soils with high groundwater level in a shallow version
 What kind of foundations are needed for houses, if groundwater is close, is chosen depending on the various features of the site itself on which construction is being carried out. A foundation on water is a structure that should ensure the stability of the building, its durability and reliability. To do this, it is necessary to take into account both the quality of the soil and the upcoming loads coming from the building.
Construction of a foundation on clay soils with a high groundwater level involves the construction of any type of foundation:
- belt, the trenches of which are deeply buried;
- pile;
- slab (shallow).
The strip base requires the creation of a monolithic reinforced concrete structure located under the external and internal load-bearing walls.
First of all, markings are made on the site, according to which they dig trenches for the strip foundation. Their depth must exceed the freezing height. The calculation is carried out adjusted for the characteristics of weather conditions (temperatures in winter) and soil.
If groundwater is close, and construction is to be carried out on clay, a strip foundation will perfectly replace a “floating” monolithic slab. The weight of the building is evenly distributed over the entire surface of the slab, which is laid on a sand and gravel bed.
Before making such a foundation, you will need to remove soil from the entire area of the future foundation. The pit is dug to a depth 50 cm greater than the thickness of the slab. The calculation is based on the soil freezing depth.

 A pile foundation for a house is the best option for creating a high-quality, reliable foundation on clay soils.
By changing the parameters of the piles, it is possible to install supports on hard rocks that are not subject to destruction under the influence of groundwater.
To carry out work in an area with high groundwater level, it is necessary to calculate the load on each individual pile.
Construction of various types of foundations
If groundwater is close to the foundation site, then before you begin constructing a slab foundation, you will need to prepare ditches along the entire perimeter of the future building. It is better if it is a trench 20-30 cm wide and at least 50 cm high (depth). The ditches will be filled with rain or melt water, and thus drainage will be carried out. For more information about the preferred type of foundation, watch this video:
 To protect the foundation walls, treat them with waterproofing mastics
 The “floating” slab does not lie on clay soil, but on a cushion created from sand and gravel. This type of foundation must be poured by building it on bulk soil. Before pouring, install a drainage system, laying drains at a slope of at least 5 cm for each meter of pipe. To protect the slab, it is necessary to line the inner surface of the base with waterproofing materials. Most often, roofing felt is used, laying overlapping sheets 10-15 cm wide. Fastening is done using bitumen.
A reinforcing frame is laid on the waterproofing and filled with concrete, the filler of which is fine gravel. It is better to fill the entire base in one day.
 A strip foundation requires careful preparation of the pit trenches. They must be deep and wide enough to exceed the freezing depth of the ground and allow the formwork structure to be assembled efficiently.
The monolithic tape is poured, taking care of the correct filling of its bottom, high-quality compaction and installation of waterproofing. A frame is installed inside the formwork, connected from reinforcing bars of various sections. Concrete is poured in layers with mandatory compaction of each layer. For useful tips when building a house on soil with high groundwater level, watch this video:
 The pile grillage foundation is recognized as the most reliable when constructing buildings in areas with high groundwater level. When making such a foundation, it is important to follow soil indicators, depending on which the size of each of the piles used is determined. Piles are used:
- screw;
- bored;
- driving.
Screw structures can be installed independently without the involvement of heavy construction equipment. After installing all the piles, a grillage is assembled on them or a beam is laid, which is necessary to tie the entire structure together.